Evolution
The Evolution package can be used to automatically optimize parameters for networks and other tasks.
One requirement is that we locate a "Data" folder in our Project to determine the root folder.
In this example we can use the following folder structure:
Project/Data/
Project/master.py
Project/folder/slave.py
master.py and slave.py can be placed anywhere in the project folder (except of the Data folder), but the slave_file variable has to be set relative to the execution directory of the master file.
In this toy example we see a simple evolution setup where the score is just the sum of all the genes in the genome. We can access the genes with get_gene(key, default) and gene(key, default) anywhere in the slave file. Alternatively we can use [default#key] inside of a string attribute of a behavior for easier access inside of NeuronGroup-, SynapseGroup- and Network-behaviors. The whole genome is a dictionary which can be accessed with get_genome(). Note, that some of the values in this dict are only casted when the get_gene() or gene() function is called.
At the end we have to set a score for the current run with set_score(score), so the Evolution-package can use it for mating and natural selection.
#folder/slave.py
from PymoNNto.Exploration.Evolution.Interface_Functions import *

#print('genes: ', get_genome())
#print('gene a: ', get_gene('a', None))
#print('gene b: ', gene('b', 1))

#NeuronGroup(...behaviors={
#   1:my_behavior(my_attribute='10+[5#a]')
# })

# [5#a] can be used as a short version of get_gene('a', 5) or gene('a', 5) that can be used inside of behavior attribute strings

score = get_gene('a', 0) + get_gene('b', 0) + get_gene('c', 0) + get_gene('d', 0)

set_score(score)
To start the evolution we can use the following master.py file. First we create one or multiple genomes (seed individuals) from which all the offspring is generated. We also assign a name to the evolution run. All data will be stored in Data/StorageManager/name/. Like mentioned above, the slave file has to be relative to the execution file of the master.py. Then we have attributes for the number of individuals, mutation rate, death rate, constraints and additional "stable" genome informations passed to the slave file.
One useful aspect is that you can run the evolution on different devices. We also initialize them with 'device_id':number_of_threads
'single_thread': 1 (runs individuals on the local main thread. number_of_threads should always be 1)
'multi_thread': 4 (creates (4) parallel threads on the local computer)
'ssh user@host password':5 (we can create (5) threads on remote ssh devices)
'ssh user2@host2':4 (the password is optional when you can have set up your ssh keys already)
Except of the single_thread, we can also use combinations of local and distributed threads.
Note that you have to be able to access your ssh device via the terminal with the given command and that PymoNNto(pip), zip and unzip have to be installed on the device. The project folders are copied to the device to .../user/my_test_evo.
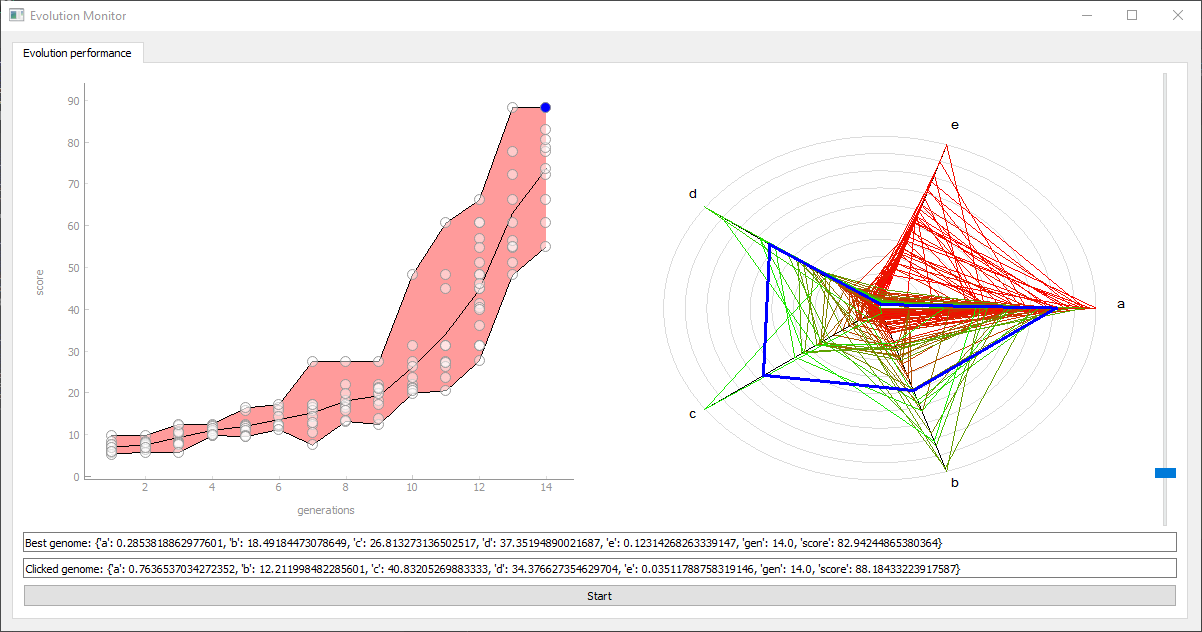
if ui enabled a window will open which shows you the current progress of the evolution. Otherwise it will output the status in the terminal.
#master.py
from PymoNNto.Exploration.Evolution.Evolution import *

if __name__ == '__main__':
    genome = {'a': 1, 'b': 2, 'c': 2, 'd': 2, 'e':3}

    evo = Evolution(name='my_test_evo',
                    slave_file='folder/slave.py',
                    individual_count=10,
                    mutation=0.4,
                    death_rate=0.5,
                    constraints=['b>=a', 'a<=1', 'b>= 2'],
                    inactive_genome_info={'info': 'my_info'},
                    start_genomes=[genome],
                    devices={'single_thread': 0,
                             'multi_thread': 4,
                             'ssh user@host.de': 0,
                             }
                    )

    if not evo.start(ui=True):
        evo.continue_evolution(ui=True)
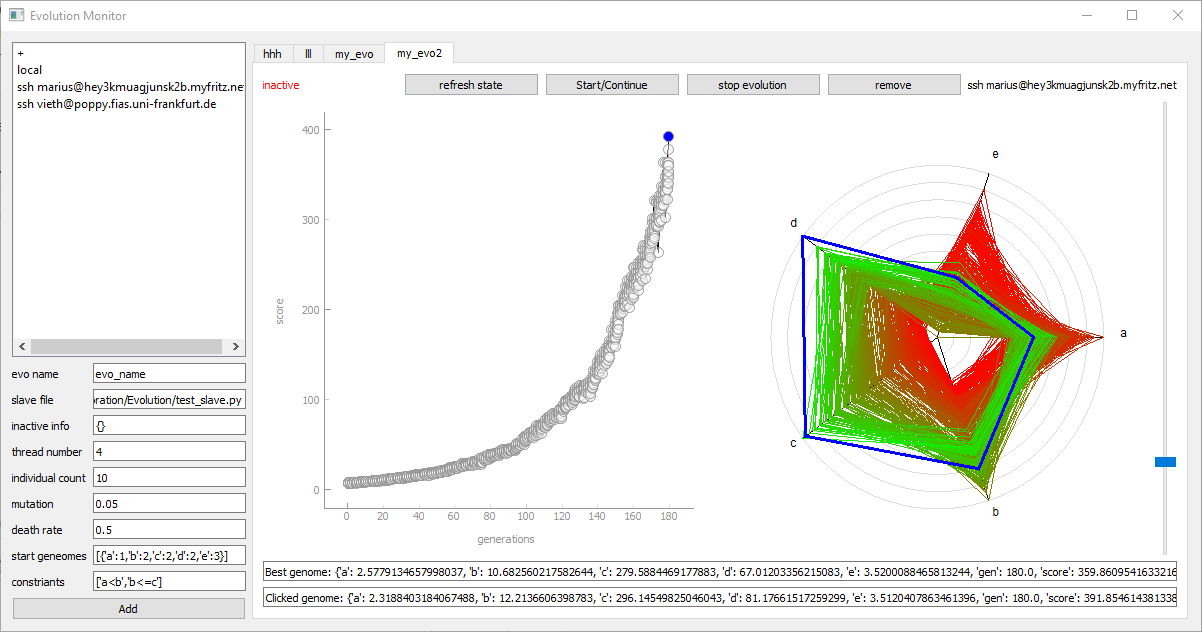
Alternatively to the master file we can use the UI_Evolution_Manager. It replaces the master.py and all the parameter can be set in the user interface. After selecting a device and an evolution-name, we can click "Add", which creates a copy of the Project as well as a new control tab. In this tab we can start, stop, refresh and remove the current evolution. The current status can be seen in the upper left corner after clicking "refresh". Each evolution instance has a unique Folder like Project/Data/Evolution_Project_Clones/evo_name. If the evolution is run on the local device, the Project is copied into this folder. If the evolution is run on a remote device, the copy is located in .../user/evo_name and the Project/Data/Evolution_Project_Clones/evo_name is only an empty shell, with some settings and a copy of the results.
When we create a new evolution instance, PymoNNto automatically creates a file similar to the previous master.py which is executed when we click on start. The name of the file is execute_evolution.py and it is located in the copied project folder.
Note that the slave file path has to be set relative to this file.
# master.py
from PymoNNto.Exploration.Evolution.Evolution_UI import *

if __name__ == '__main__':
    Evolution_UI().show()